
You can edit and customize the fields displayed on a client's profile, including their order, who they apply to, who can see them, and when clients and staff are asked to fill them in.
Key tips
To open the Client Profile Fields page, you need the Manage clients permission.
Changes to the Status toggle and the order of the fields save right away. Changes you make in the Edit field panel don't save until you click Save.
Image, First name, Last name, and Email/Username are always on. You can't set them to OFF, and you can't change their order.
You can rename any field, but you can't change its type.
Your existing settings were converted automatically, so clients and staff are asked for the same information as before.
Understanding the Client Profile Fields page
The Client Profile Fields page lists every default and custom client profile field.
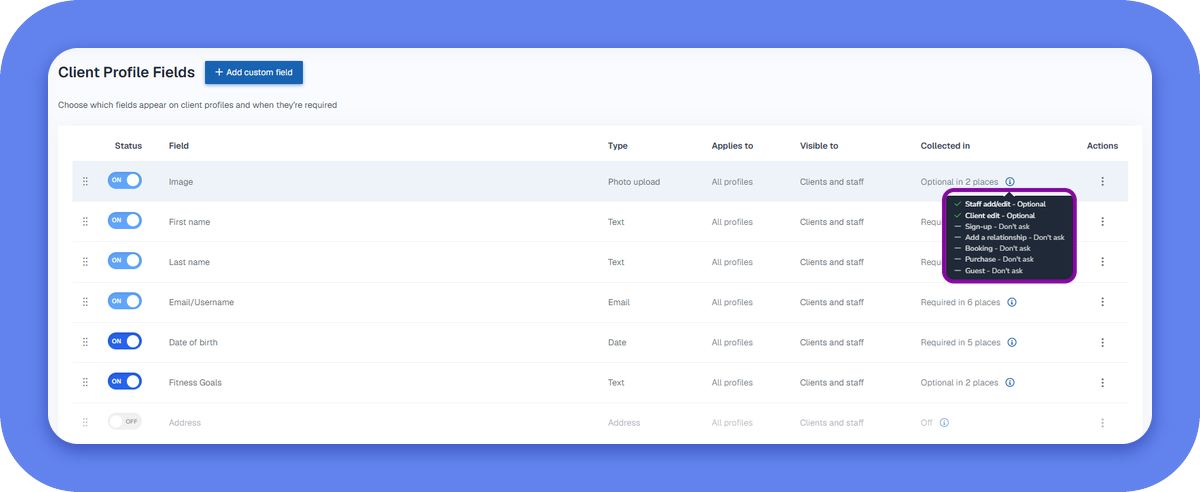
Each row shows the following:
Status – Whether the field is set to ON or OFF.
Field – The name of the field.
Type – How the field is filled in, such as Text, Date, or Dropdown.
Applies to – Whether the field is for all profiles, child profiles, or parent profiles.
Visible to – Whether clients and staff can see the field, or only staff.
Collected in – A summary of where clients and staff are asked for the field, such as Optional in 2 places or Required in 6 places. If the field is set to OFF, it reads Off. Hover over Info
 to see the setting for each entry point. A check mark means the field is asked at that entry point, and a dash means Don't ask.
Actions – Select Edit to edit a field. For custom fields, you can also select Delete.
For more information about each setting, see Client profile fields.
Set a field to ON or OFF
When you set a field to OFF, it's hidden from clients and staff. The information clients already entered and the field's settings are kept, so you can set it back to ON at any time.
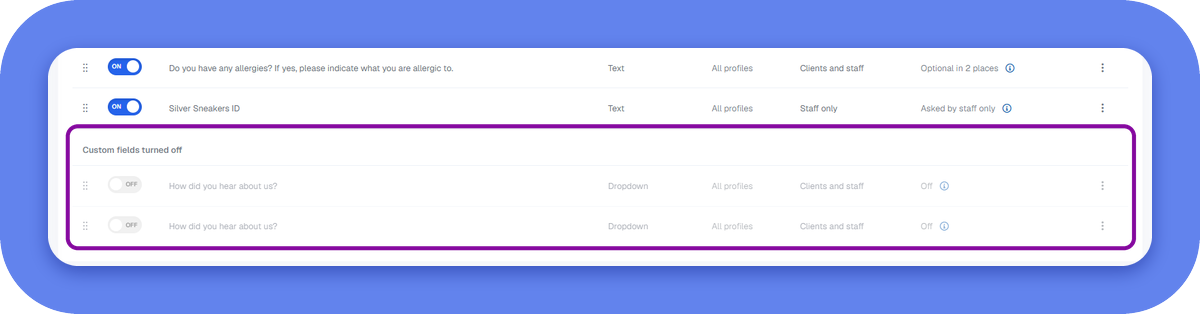
To set a field to ON or OFF:
Open the App Drawer
 then click View All > Setup > Clients > Client Profile Fields.
Under Status, set the toggle next to the field to ON or OFF. The change saves right away.
Custom fields set to OFF move to Custom fields turned off at the bottom of the page. Default fields set to OFF stay in place and appear dimmed.
Edit a client profile field
Use the Edit field panel to rename a field and change who it applies to, who can see it, and when clients and staff are asked for it. What you can change depends on the field:
Custom fields – You can change all of the settings except the field type, which is set when you add the field. For Dropdown and Choose One fields, you can also edit the choices.
Default fields – You can rename the field and change who it applies to, who can see it, and when it's asked for. You can't change the field type, which shows as Built-in. Choices in default Dropdown fields can't be edited.
Email/Username – You can rename the field, and under Where should we ask for it?, you can set When staff add or edit a profile to Optional or Required. All other settings are locked: the field applies to all profiles, is visible to clients and staff, and is required at every other entry point.
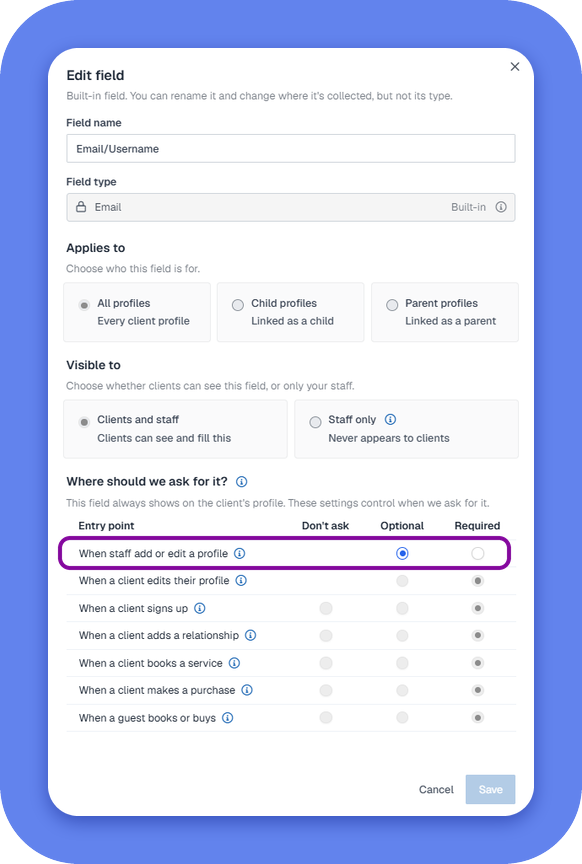
To edit a client profile field:
Open the App Drawer
then click View All > Setup > Clients > Client Profile Fields.
Click Actions
 next to the field, then select Edit. The Edit field panel opens.
Optional: Under Field name, enter a new name for the field.
If the field is a custom Dropdown or Choose One field, under Choices, update the choices:
To add a choice, click Add choice then enter the choice.
To rename a choice, enter a new name in its field.
To delete a choice, click Delete
 next to it. Clients who selected that choice are assigned the default value.
To change the order of the choices, drag Move
 next to a choice.
Under Applies to, select All profiles, Child profiles, or Parent profiles.
Under Visible to, select Clients and staff or Staff only.
If you select Staff only, only When staff add or edit a profile is available in the next step.
Under Where should we ask for it?, select Don't ask, Optional, or Required for each entry point. For more information, see Client profile fields.
Click Save.
If you close the panel with unsaved changes, in the Discard changes popup, click Discard to close without saving, or click Go back to keep editing.
Change the order of the fields
The order of the fields is the order they appear in on client profiles and in the forms clients fill in.
To change the order of the fields:
Open the App Drawer
then click View All > Setup > Clients > Client Profile Fields.
Drag Move
next to a field up or down to a new position. The new order saves right away.You can't change the order of the first four fields.
Add a custom client field
Custom fields let you track information that isn't included by default. For more information about field types, see Custom client fields.
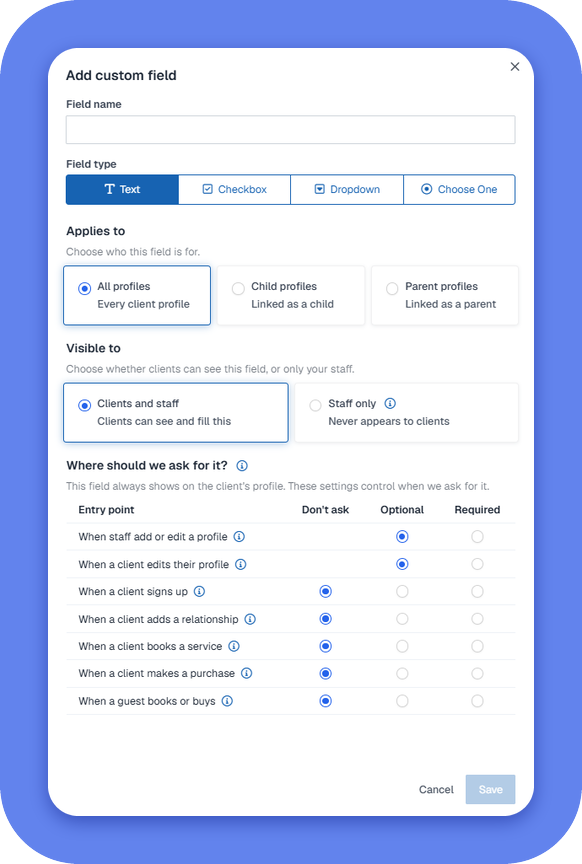
To add a custom client field:
Open the App Drawer
then click View All > Setup > Clients > Client Profile Fields.
Click Add custom field.
Under Field name, enter a name for the field.
Under Field type, select Text, Checkbox, Dropdown, or Choose One.
If you selected Checkbox, select whether the checkbox is checked or unchecked by default.
If you selected Dropdown or Choose One, under Choices, enter each choice. To add another choice, click Add choice. Then select a default value.
Under Applies to, select All profiles, Child profiles, or Parent profiles.
Under Visible to, select Clients and staff or Staff only.
If you select Staff only, only When staff add or edit a profile is available in the next step.
Under Where should we ask for it?, select Don't ask, Optional, or Required for each entry point. For more information, see Client profile fields.
Click Save. The field is added to the bottom of the list.
To change the order the field is displayed in client profiles, drag Move
next to the field up or down in the list. The new order saves right away.
Delete a custom client field
To delete a custom client field:
Open the App Drawer
then click View All > Setup > Clients > Client Profile Fields.
Find the custom client field you want to delete, click Actions
then select Delete.
In the confirmation popup, click Delete.