
Staff members can modify or cancel a scheduled event instance from the schedule or the setup menu. You can also restore a canceled event instance from the schedule.
To learn how to cancel a booked event for an individual client, see Cancel an event booking.
Modify an event instance from the schedule
To modify an event instance from the schedule:
Open the App Drawer
 then click View All > Schedule.
Find the event you want to modify on the schedule.
If you’re viewing the schedule in Calendar view, click the event on the schedule. Next to the event’s name, click Options
 and select Modify schedule.
If you’re viewing the schedule in List view, click Options
next to the event and select Edit Event Schedule Details.
Select the dates for which you want to modify the event.
To modify the individual session of the event instance, select Single day.
To modify multiple sessions, select Multiple days, then select the desired date range. Click Next, then select the desired sessions.
Click Next.
Click Edit
 next to each field you want to modify and make any necessary changes. When all your changes are made, click Next.
Determine whether you want to notify clients of changes by selecting the Send email to affected client, the Send SMS to affected client, and/or the Send push to affected client checkboxes. Click the corresponding Customize option to edit the notifications, then click Next.
Click Complete.
For a more detailed breakdown of each field you can modify, see Scheduled event settings.
Cancel an event instance from the schedule
Browser – Staff Back Office
To cancel an event instance from the schedule in the Staff Back Office:
Open the App Drawer
then click View All > Schedule.
Find the event you want to cancel on the schedule.
If you’re viewing the schedule in Calendar view, click the event on the schedule. Next to the event’s name, click Options
and select Cancel event.If you’re viewing the schedule in List view, click Options
next to the event and select Cancel event.
Select the dates for which you want to cancel the event.
To cancel the individual session of the event instance, select Single day.
To cancel multiple sessions, select Multiple days, then select the desired date range. Click Next, then select the desired sessions.
Click Next.
Determine whether you want to notify clients of the cancellation by selecting the Send email to affected client, the Send SMS to affected client, and/or the Send push to affected client checkboxes. Click the corresponding Customize option to edit the notifications, then click Next.
Click Complete.
Mobile – Elevate Staff App
To cancel an event instance from the schedule in the Elevate Staff App:
Tap the Schedule tab.
Tap the event session you want to cancel in the schedule.
In the top-right corner, tap Action
 then tap Cancel Session.
Under Start Date, select a start date for the cancellation.
Under End Date, select an end date for the cancellation. If you want to cancel all future dates for the event, set All Sessions Going Forward to ON. Tap Next.
If multiple sessions occur in the selected time period, select which event sessions are affected by the cancellation. Tap Next.
To notify clients of the cancellation, set Send Email to affected clients and/or Send SMS to affected clients to ON. Tap Next.
To display canceled sessions of the event on the schedule, set Display as canceled on schedule to ON.
Verify your changes, then tap Complete.
Restore an event instance from the schedule
To restore an event instance from the schedule:
Open the App Drawer
then click View All > Schedule.
Switch the schedule to List view
 .
Find the event you want to restore on the schedule. Canceled event sessions are only displayed if the View canceled classes/events setting under Schedule settings
 is set to ON.
Next to the event, click Options
and select Restore canceled sessions.
Select the dates for which you want to restore the event.
To restore the individual session of the event instance, select Single day.
To restore multiple sessions, select Multiple days, then select the desired date range. Click Next, then select the desired sessions.
Click Complete.
Modify an event instance from the Setup menu
To modify an event instance from the Setup menu:
Open the App Drawer
then click View All > Setup > Services > Events.
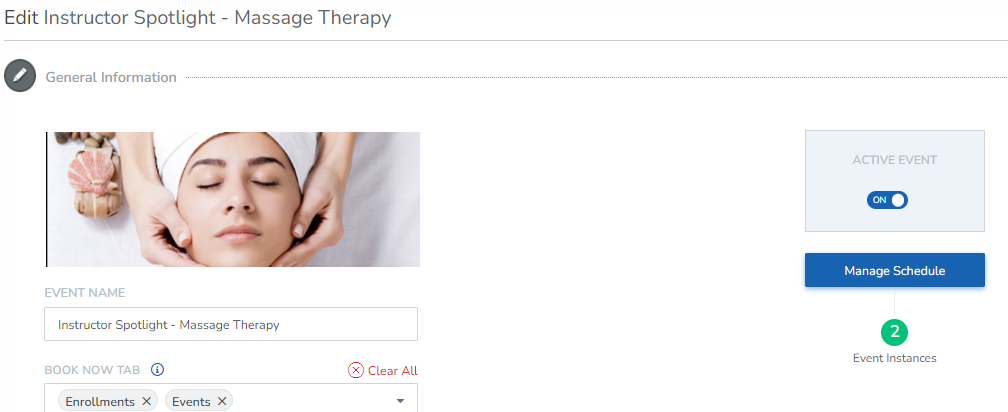
Click the event you want to modify an instance of, then click Manage Schedule.
Find the event instance you want to modify. Use Sort
 at the top of the page to order event instances by oldest or most recent.
Under the Action column, click Action
then click Edit.
Select the date range you want to modify sessions during, then click Next.
Select the individual sessions you want to cancel, then click Next.
Click Edit
next to each field you want to modify and make any necessary changes. When all your changes are made, click Next.
Determine whether you want to notify clients of changes by selecting the Send email to affected client, the Send SMS to affected client, and/or the Send push to affected client checkboxes. Click the corresponding Customize option to edit the notifications, then click Next.
Click Complete.
For a more detailed breakdown of each field you can modify, see Scheduled event settings.
Cancel an event instance from the Setup menu
To cancel an event instance from the Setup menu:
Open the App Drawer
then click View All > Setup > Services > Events.
Click the event you want to cancel an instance of, then click Manage Schedule.
Find the event instance you want to cancel. Use Sort
at the top of the page to order event instances by oldest or most recent.
Under the Action column, click the Action
then click Cancel.
Select the date range you want to cancel sessions during, then click Next.
Select the individual sessions you want to cancel, then click Next.
Determine whether you want to notify clients of the cancellation by selecting the Send email to affected client, the Send SMS to affected client, and/or the Send push to affected client checkboxes. Click the corresponding Customize option to edit the notifications, then click Next.
Click Complete.