
🚀 Release 26.77 is here!
Release 26.77 helps you stop chasing leads who’ve already booked and ask each client only the questions that apply. Clients can also reserve and pay for a court, room or piece of equipment right from your website, and join the wait list when it’s full.
Owners like you shape every release. See who inspired this one at the end.
✨ What's new
Let your automations move leads to the right stage for you
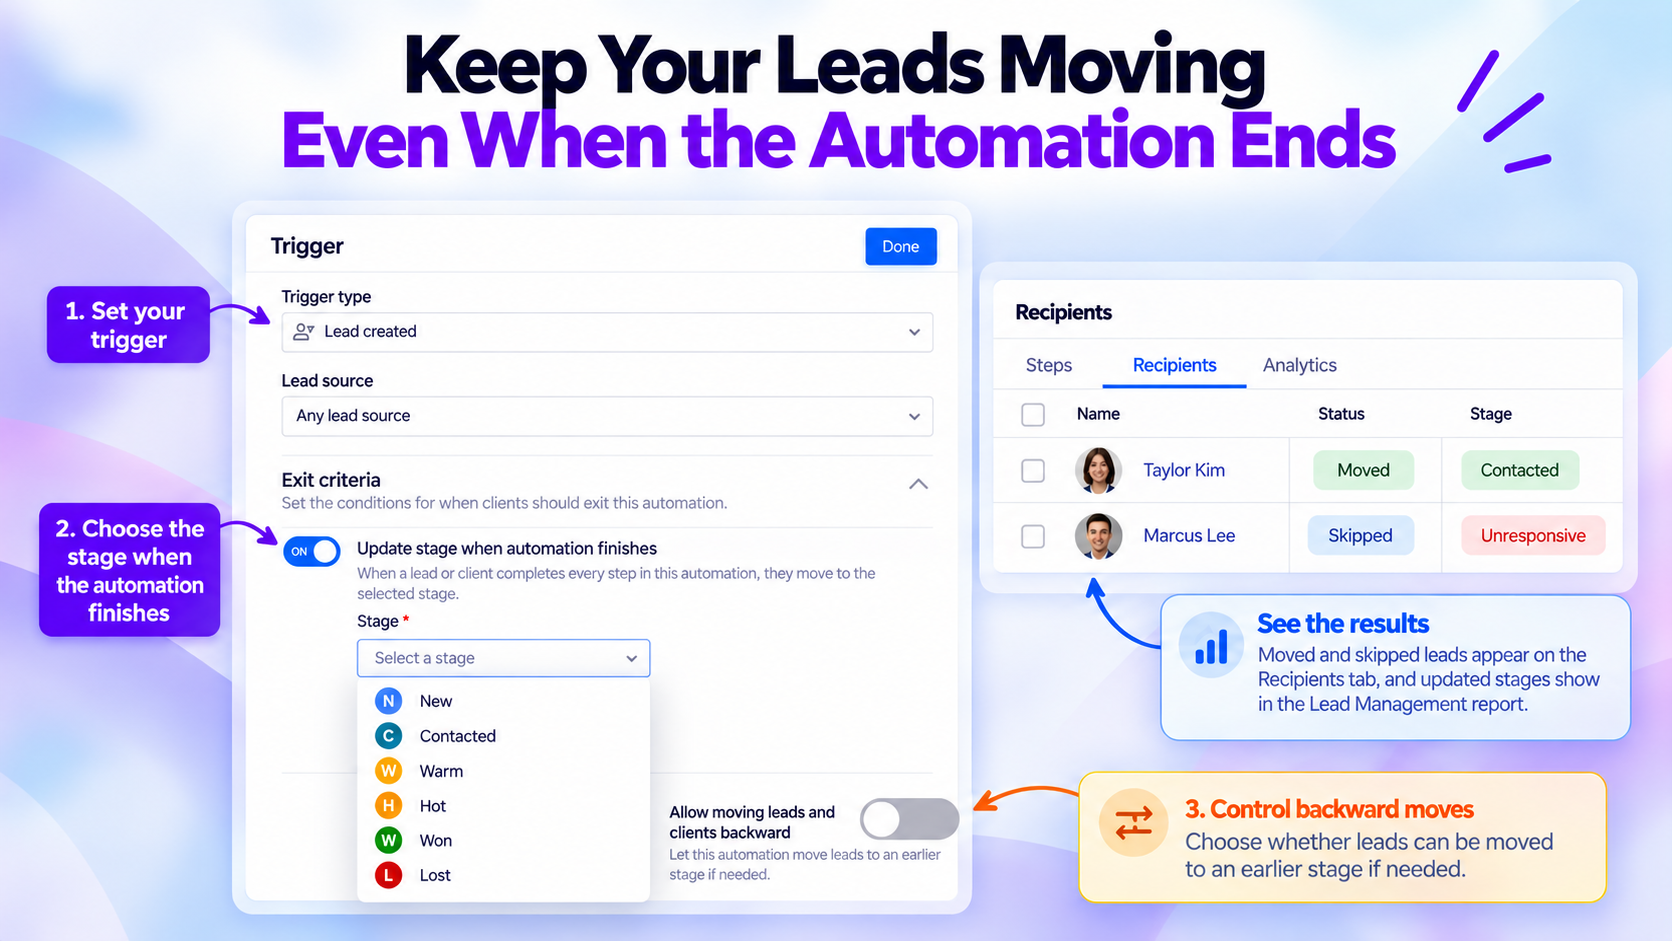
Ensure your leads reach the right stage automatically
Keep track of leads who book, reply, or go quiet. Your automations can now move each lead to the right stage for you, and can stop messaging them when their stage changes.
Leads who book or reply stop getting follow-ups, so they aren’t nudged about something they’ve already done. And every move is logged so you can see why a lead landed where it did.
Here's how it works. Say your new inquiry automation sends three follow-ups over a week:
If the lead books a consult, they leave the automation and move to Consult booked.
If the lead replies to your text, they leave the automation and move to Contacted.
If they get all three messages without responding, they move to Cold.
If your staff mark them Lost partway through, the remaining messages stop.
What you can do
Move leads automatically - Turn on Move leads and clients to a lead stage when this condition is met under Exit Criteria. For leads who go quiet, turn on Update stage when automation finishes.
Stop messages when a stage changes - Add the new Lead stage changes exit criterion so a lead leaves the automation before your next message.
Mention the stage a lead just left - Add [PreviousStage] to a message to name the stage a lead just left.
Message only the right leads - The new Lead stage audience filter checks a lead’s stage when the automation starts for them, no matter what starts it
📍 App Drawer → Marketing Suite → Automations, then Exit Criteria in the Trigger panel. These settings are off by default.
Good to know: Automations only move a lead back to an earlier stage if you turn on Allow moving leads and clients backward.
Ask each client only the questions that apply to them
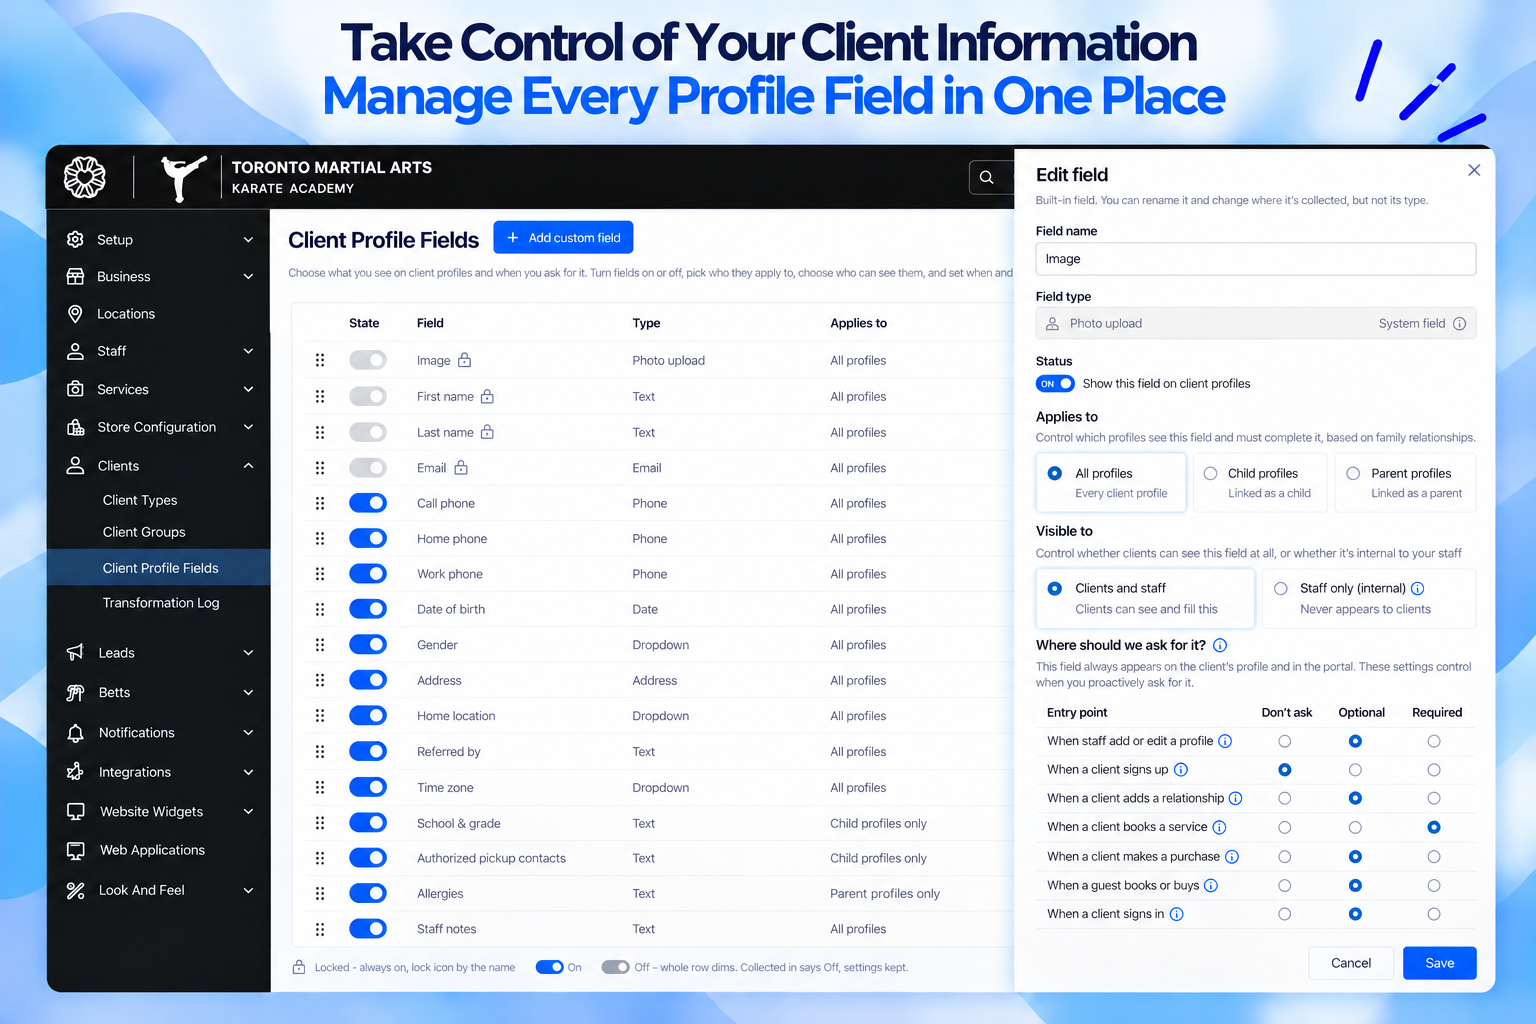
Choose who each client field is for, who sees it, and when you ask for it, all on one page
You can now ask for child-only details like allergies without asking everyone. For each profile field, you can choose who it applies to, who sees the answer, and when to ask it.
Each field now has three settings:
Who it applies to - All profiles, child profiles only, or parent profiles only.
Who can see it - Clients and staff, or staff only.
Where clients are asked - Don't ask, Optional, or Required at seven moments, including sign-up, booking, and purchase.
For example, add an Allergies field that applies to child profiles only, make it Required when a client adds a family member, and leave it as Don't ask at purchase.
The Collected in column shows where each field is asked, such as "Required in 3 places."
📍 App Drawer → Setup → Clients → Client Profile Fields. By default, you and your managers can change these settings. Existing settings carry over.
Good to know: Your booking widget, purchase, guest, and add-family-member forms all follow these settings.
Know where every failed payment stands before you call the client
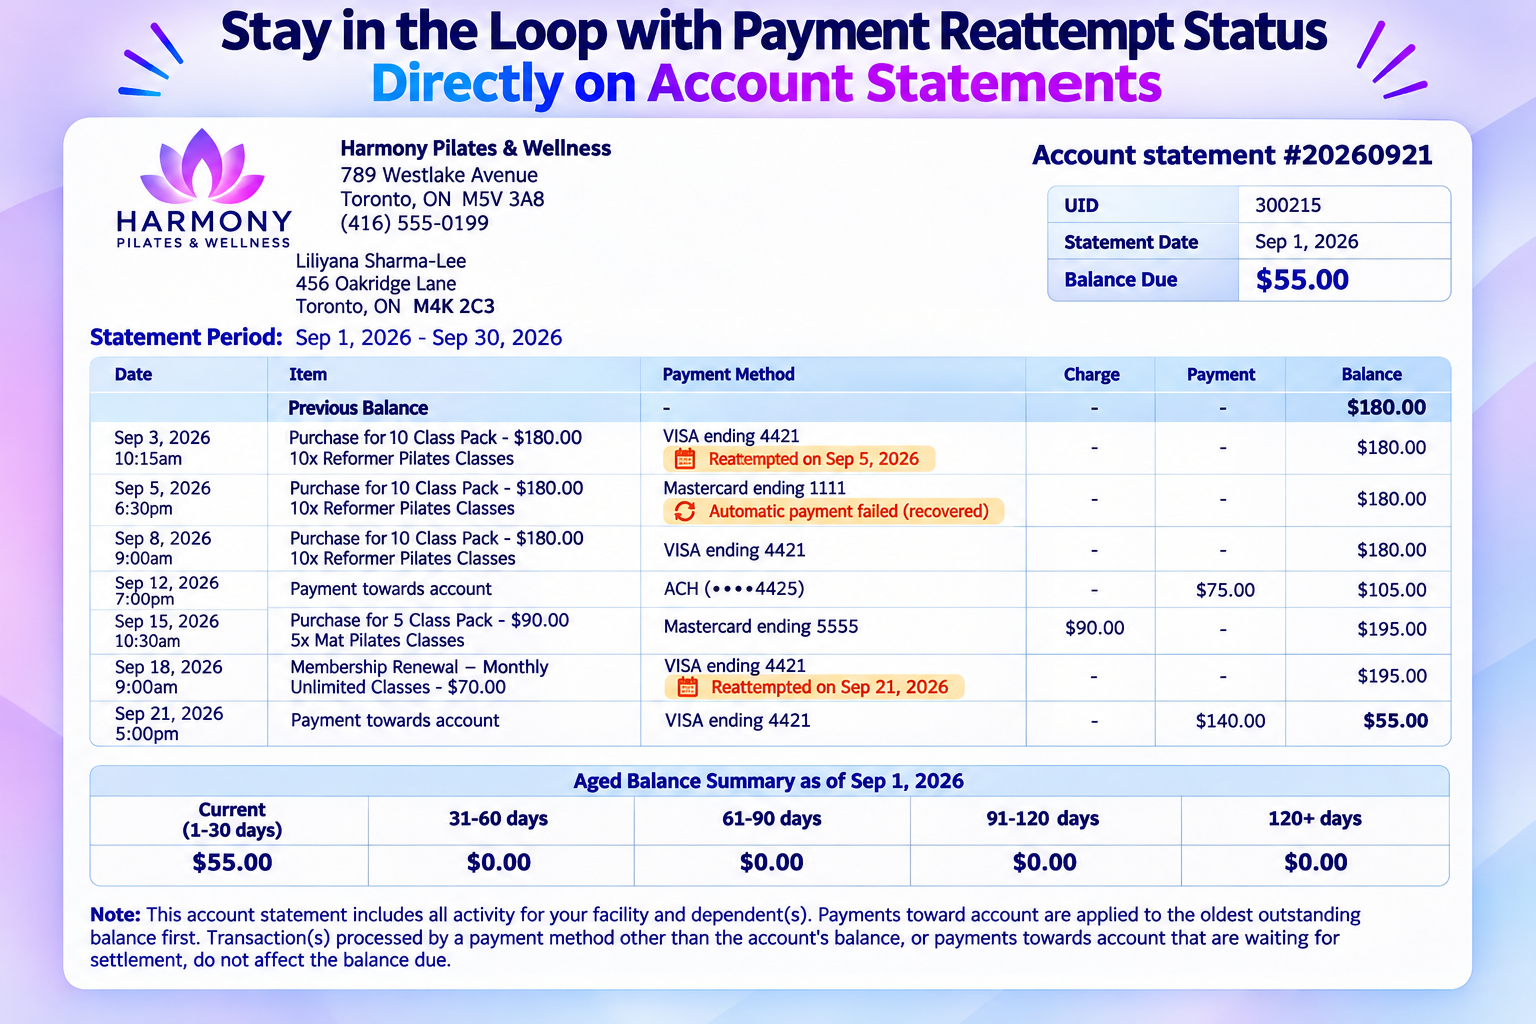
Badges show when a failed payment was reattempted or recovered
Your front desk can now see at a glance where each failed payment stands. When an automatic payment fails, we try it again on a schedule, and each failed payment on a client’s statement now has a badge that says what happened next.
For example, if a payment fails on Aug 10 and the Aug 12 retry fails too, the Aug 10 row reads "Reattempted on Aug 12," and the Aug 12 row reads "Reattempt scheduled on Aug 14" until the next try runs.
What each badge means
Reattempt scheduled on [date] - The payment failed, and another try is scheduled.
Reattempted on [date] - That retry ran, but it failed too.
Automatic payment failed (recovered) - A later retry went through.
Automatic payment failed (charged on account) - The final retry failed, so the amount was charged to the client's account balance.
📍 No setup needed. Failed payments appear on a client’s account statement if Include failed transactions is On when generating a statement from a profile or the Balance Due report.
Turn your website into a booking desk with the new Asset Widget
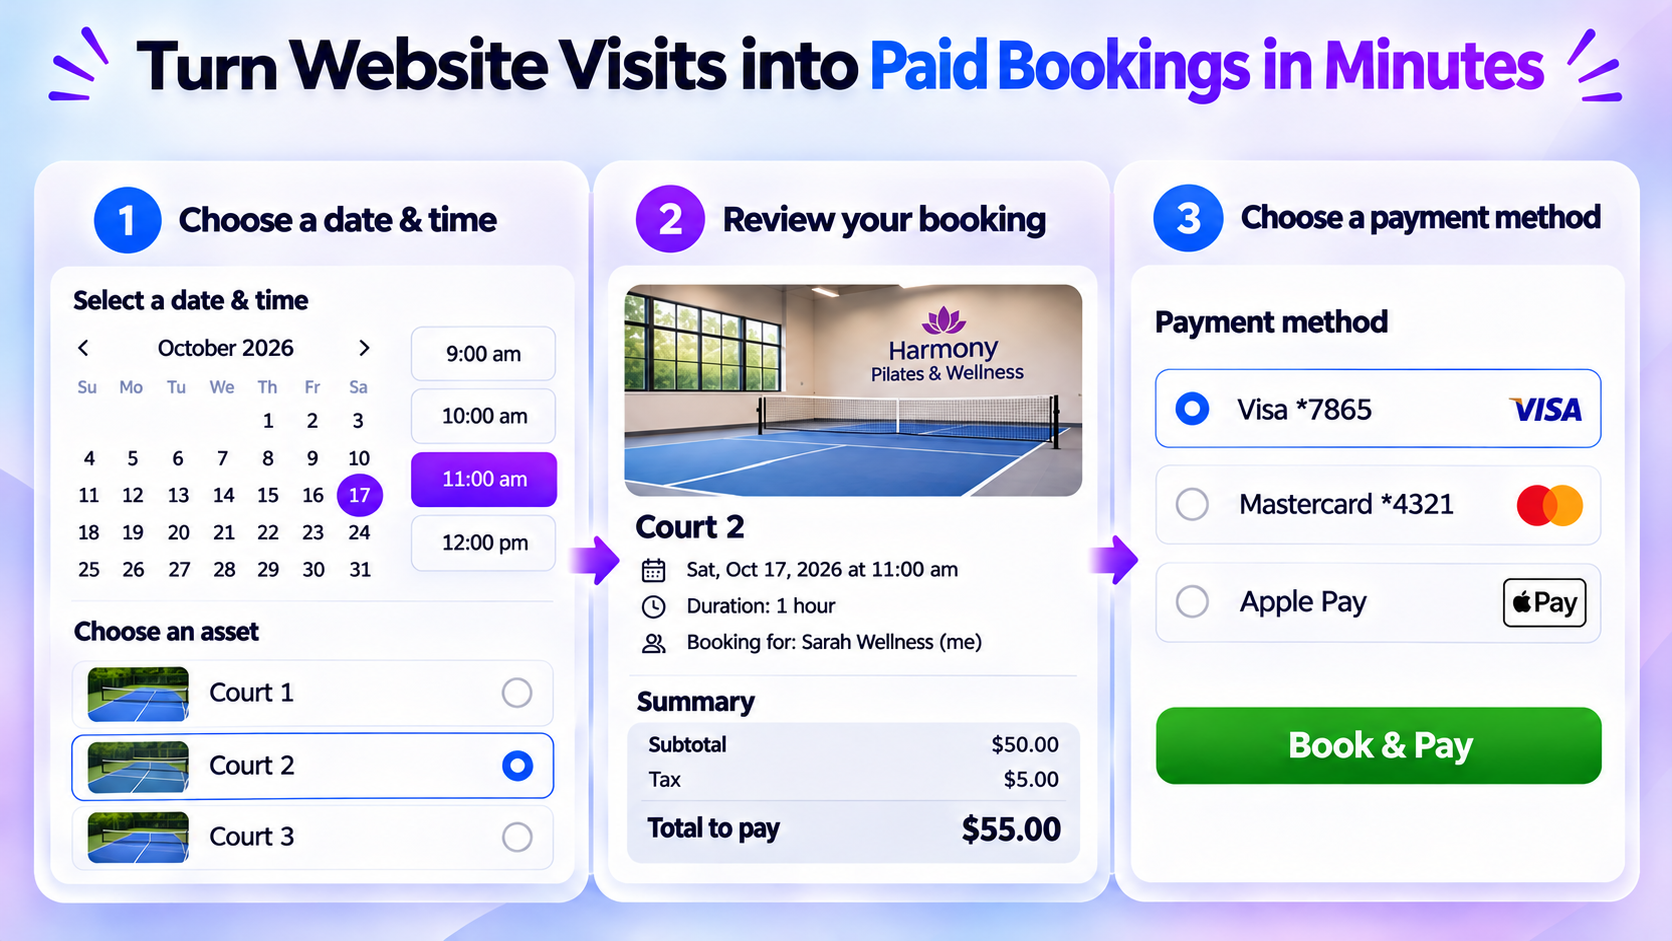
Clients can reserve and pay for assets without leaving your site
You can now let clients reserve a court, room, or piece of equipment, and pay for it, without leaving your website. No more sending them to the Client Portal to finish.
Say a client lands on your site Friday night and wants Court 2 on Saturday morning. They pick a time and their spot, pay, and see their confirmation. Nobody on your team has to take a call or a message.
Clients can check what’s open without logging in. They sign in or create an account only when they confirm, so nothing slows them down before they’ve seen what’s available.
What you can do
Let clients search their way - They can start with the asset, or start with the date and time (if you’ve turned on Allow clients to select a date and time, then the available asset).
Show your layout - If a category has a visual layout, clients tap the exact spot they want. Otherwise they see a simple list.
Fill full slots - Clients can join the wait list when your policies allow it. For assets that need your approval, clients see “requested” until you approve or deny the booking in the back office.
Get paid your way - Clients pay with a purchase option, redeem points or prizes, or buy a new purchase option. If your policies allow it, they can book now and pay later.
Book for the family - Clients can book for themselves or a family member, and add a new family member during booking.
📍 App Drawer → Setup → Website Widgets → Asset
Good to know: The widget follows your existing booking rules, including age restrictions, negative-balance rules, required forms, and contract or waiver signing. Multi-location studios can let clients switch locations. Custom colors and branding, recurring bookings, add-ons, and booking several assets in one checkout aren’t available yet.
Book appointments from your front desk in fewer clicks
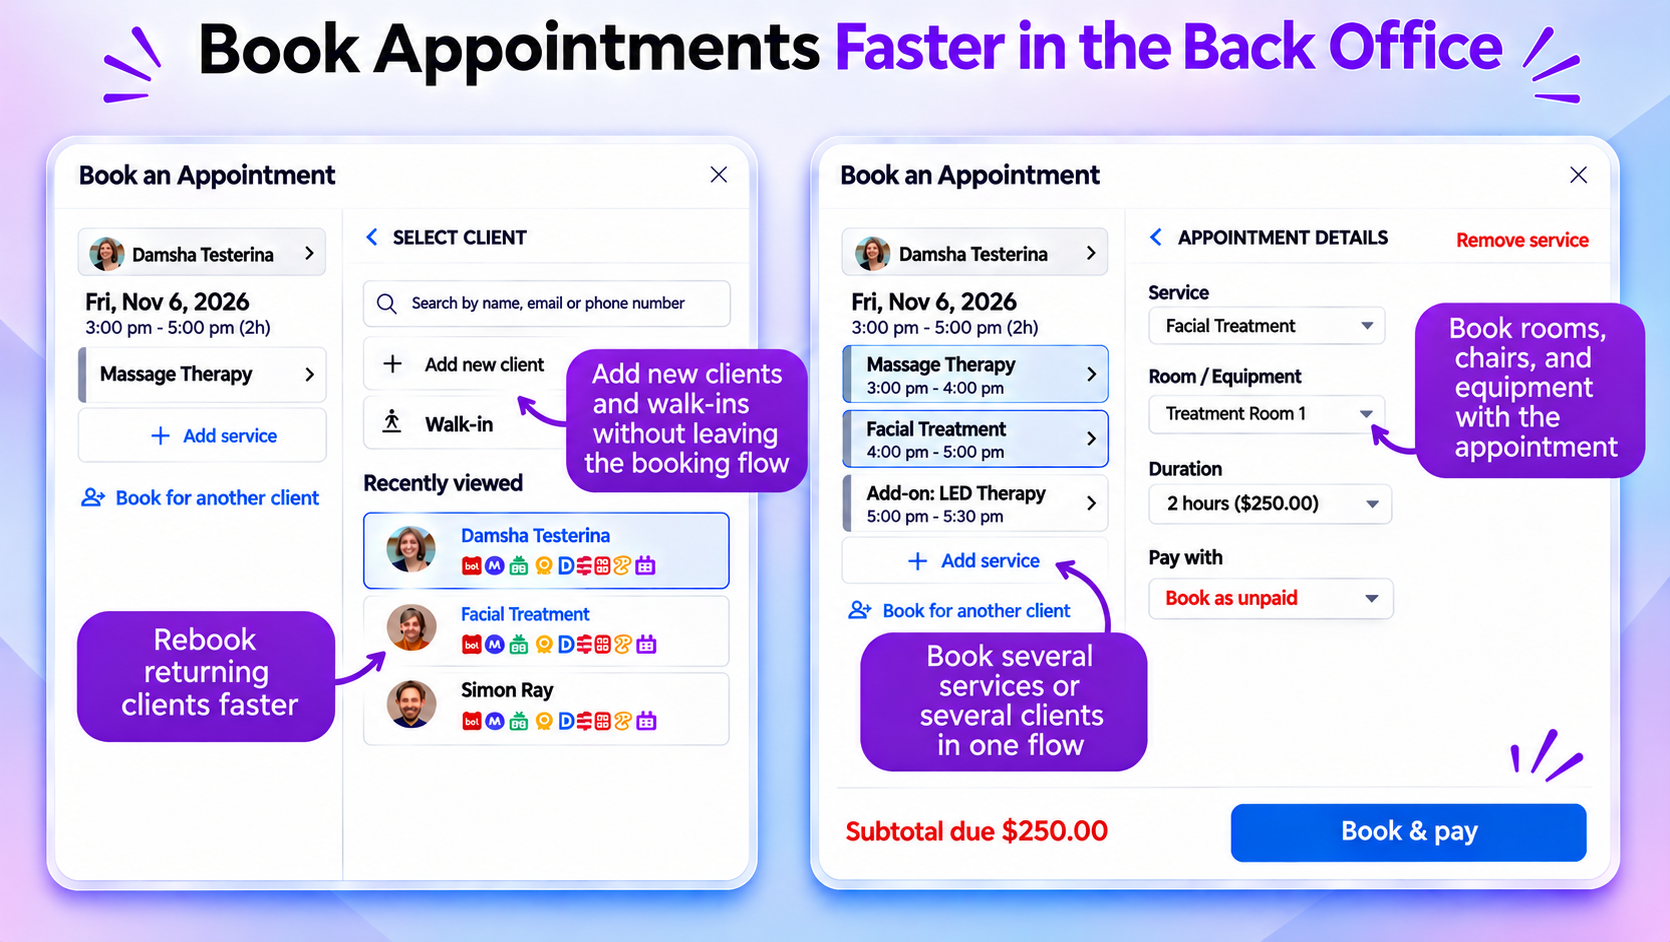
Rebook regulars, schedule multiple services, and reserve rooms - all in one seamless flow
You can now book appointments faster from the back office. We rebuilt the scheduling flow so your staff spend less time jumping between screens and more time with your clients.
What you can do:
Rebook returning clients faster - Pick from recently viewed clients and a client’s last three booked services, so rebooking a regular takes fewer steps
Book several services or several clients in one flow - Add multiple services or add-ons for the same client in one transaction, and they’re scheduled back-to-back automatically. You can also book multiple clients and walk-ins together, without jumping between screens.
Book rooms, chairs, and equipment with the appointment - Reserve the dedicated room, chair, or piece of equipment in the same step as the service.
Check out faster at the front desk - The booking flow automatically applies a client’s eligible purchase option or membership. Selling a new package or session pass? Go straight to checkout with the package already loaded. Staff you’ve given permission can also choose Book Unpaid or Pay Later.
Add new clients and walk-ins without leaving the booking flow - Register a new client, capture a walk-in, and add booking notes right where you book, with no waiting for extra pages to load.
📍 No setup needed. New booking flow will appear in the schedule automatically after release.
✨ Now rolling out
Sell tickets to recitals and shows with Ticketed Events
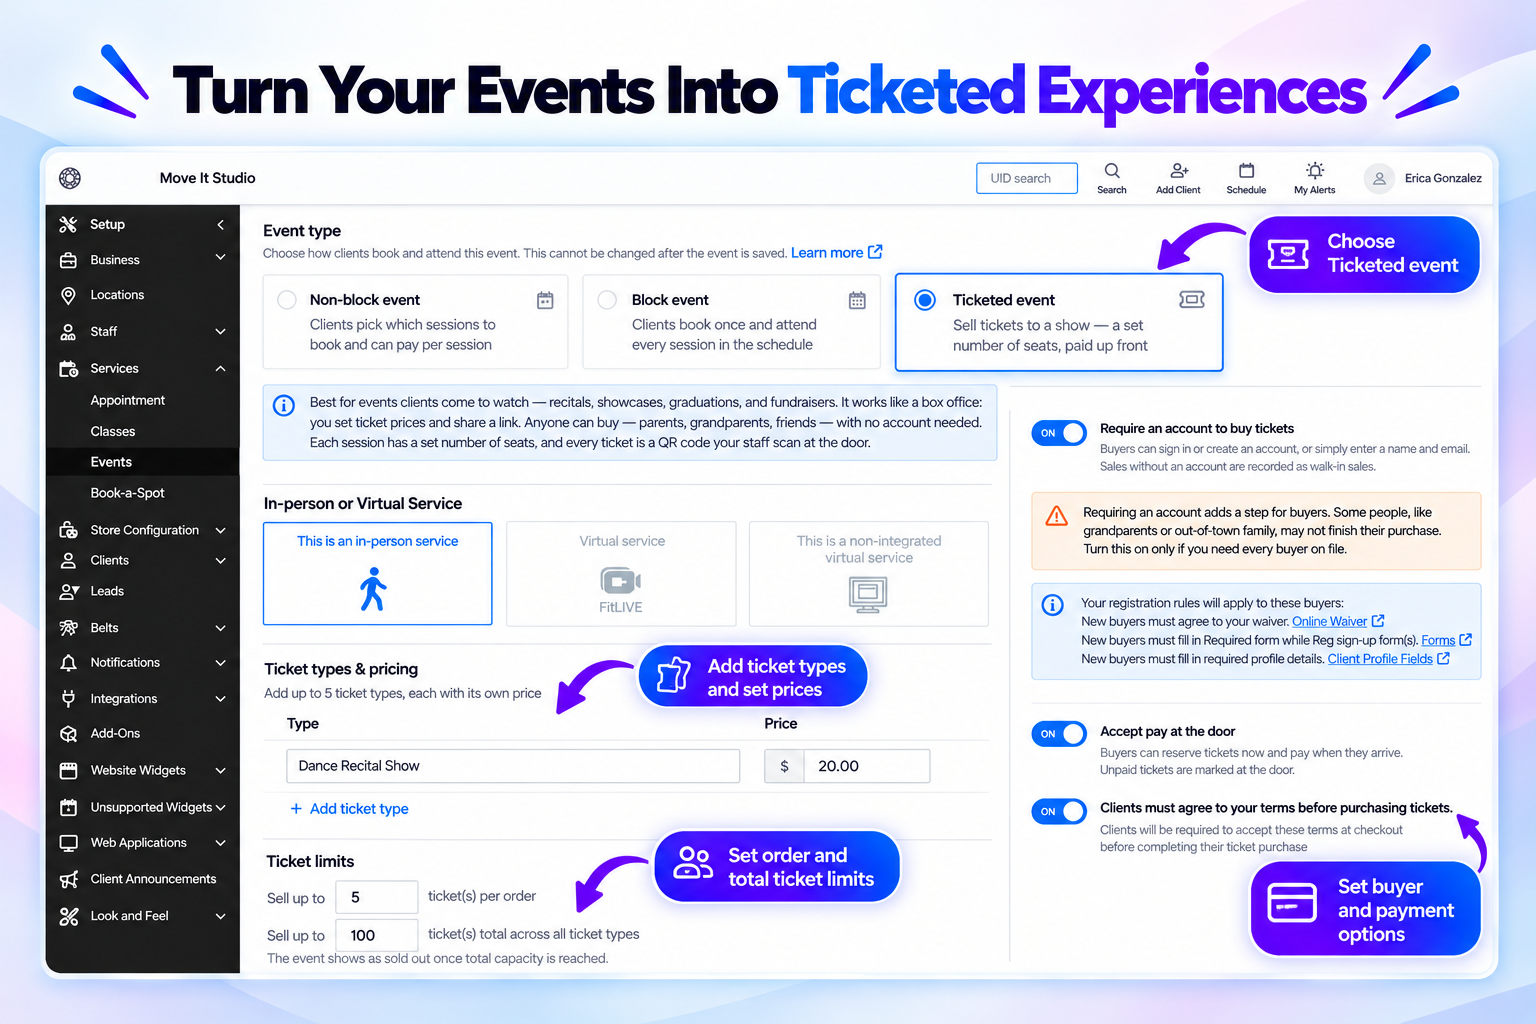
Set ticket prices, manage capacity, and customize purchasing options - all in one place.
You can now sell tickets to your recitals, performances, and workshops right inside WellnessLiving, so you don’t need a separate ticketing tool. Set your capacity and prices once, sell tickets online or at your front desk, scan guests in at the door, and watch sales build on your schedule.
Your guests check out with just a name, email, and card, with no account to set up first. If they don’t save their details, no client profile is created, so your client list stays free of one-time buyers. If their email already belongs to an account, they verify it and sign in.
What you can do
Sell at your front desk, too - Your staff can sell tickets to a client on file or a walk-in from the Staff Back Office and Store. Tickets are emailed when there’s an address and printed when there isn’t.
See how full your event is at a glance - Your schedule shows tickets sold against capacity, like 142 / 200, with shortcuts to open the scanner or view ticket sales.
Know who actually showed up - Ticketed events appear in your Event Details and Event Summary reports. Booked means tickets sold but not yet scanned. Attendance means tickets scanned at the door.
Give guests everything in one email - The Ticket purchase confirmation email can include the order summary, QR codes, a link back to the tickets, and a PDF attachment. Guests can view, print, download, or add tickets to a wallet, so they have them ready at your door.
📍App Drawer → Setup → Services → Events, then choose Ticketed event as the event type. To customize the confirmation email, go to Client Notifications → Events → Ticket purchase confirmation.
Good to know: You can change your event type until someone books or buys a ticket, and after that it can’t be moved into or out of Ticketed. Tickets are issued once payment is complete and are delivered mainly by email, since SMS and push notifications reach only buyers with an account and can’t carry QR codes. Ticketed Events doesn’t include assigned or numbered seating, buyer-initiated refunds, ticket transfer or resale, season passes, offline scanning, or pay at the door.
✏️ More updates
Payments
No more surcharge on debit and prepaid cards - If you take Paragon payments in the US, Canada, or the UK, your clients no longer pay a surcharge on debit and prepaid card payments. Heads up: staff can no longer override it.
See everyone a payment covered - In Balance History, the Recipient column now lists everyone a payment or purchase on account covers, not just the person who paid. Statements show the same names when Show family and dependents activity is on.
Marketing and automations
Reach clients who've never bought - The new No purchase history option in the Past purchases audience filter (Marketing Suite → Audience Filter) finds clients and leads with no paid purchase. Use it to send a first-purchase offer. Failed, comped and $0 sales don't count.
Send sign-in steps from any automation - You can now add the Login and Password Message variables to any automation, including ones that start when someone buys a purchase option. Clients you register and sell to get sign-in steps in your own branded message.
Your campaign still gets credit for sales made during its final Delay - If your automation ends with a Delay step, clients stay In Progress until it finishes. A purchase or booking during that wait still credits the campaign for the sale. Heads up: this applies to active automations that already end with a Delay.
See which ads bring in new clients - Know which ad or link brought in each booking, even after visitors click around your site. Your widgets now keep the original campaign tags, so your marketing reports credit the right source more reliably.
Booking and check-in
Guest passes work at every location in your region - Clients with a regional-access guest pass can use it at any location in the region, not just their home location, from the Client Portal and the Achieve app.
New classes show up in your widget automatically - In your Custom Schedule widget, pick a whole Book Now tab and any class you add to that tab appears on its own. Prefer to choose? Select individual classes. Existing widgets keep showing the same services.
Wait List for appointments with assets bookings - Clients can now join the wait list when an appointment that uses a room or piece of equipment is full, if you’ve turned on the wait list policy for that service.
Around the back office
Know which date range you're looking at - In your Staff Back Office reports, the date picker now shows the range (like “Last 30 days”) above the dates. We also added Yesterday and Last 14 days. Last # days ranges don’t include today.
Go from Reports straight to your client list - Reports → Clients now has an All Clients link that opens your Clients tab.
Export attendance with the date and time of each visit - When you add Date and Time as columns on a client's Attendance History or Upcoming Schedule page, they now also appear in CSV, Excel, and PDF exports. For bookings between 11 PM and midnight, exports show only the start date.
💡 Behind the Build
Every release starts with a conversation, and these are the owners who started this one.
Thank you to the team at Tippi Toes for championing ticketed events, helping us make it easier to sell and manage seats for the experiences you create.
We're grateful to the team at Table Tennis America in Fremont, California, for pushing us toward clearer attendance reports, so you can see who's showing up and make decisions with confidence.
A special thank you to Kevin Fukami at LEVEL Fitness Centre in Calgary, Alberta, for the idea behind sending sign-in steps from any automation, a simple way to welcome new clients with their sign-in steps in your own branded message.
To Tippi Toes, Table Tennis America, Kevin, and every owner who takes the time to share feedback and submit ideas, thank you. Keep them coming in the Community Forum. Your next suggestion could shape what we build next.
Got an idea for a future release? Share it in the Community Forum.